
1. If you have your machine plugged into wall current, turn off the power at the circuit breaker in your home or office.
You don't want to touch a wet wire carrying 110 volts or so.
If you're running the machine on battery power, it's still operating, and you don't see sparks, hear odd noises, or smell burnt electrical components, shut your laptop down through the normal Windows process.
If something is obviously wrong with the machine, turn it off immediately by depressing the Off switch or by removing the battery.
2. Ground yourself by touching the center screw on the faceplate of a dry electrical outlet or by touching some other metal object that reaches to ground.
3. If you haven't done so in emergency mode, remove the AC adapter and the battery, and set them aside.
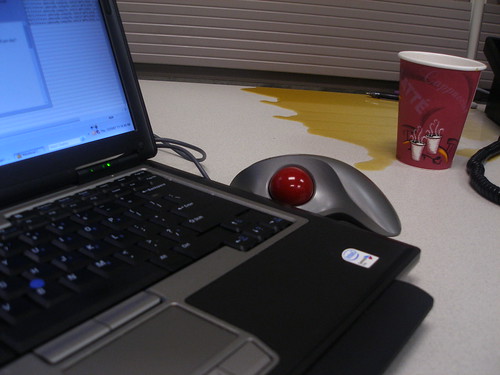
4. Disconnect any external devices (such as a mouse) attached to the USB, FireWire, serial, or other ports.
5. If you find any liquid on the battery or AC adapter, wipe them carefully and set them aside.
If your spill has thoroughly soaked the AC adapter or the battery, you probably need to consider it a loss. You can get replacement AC adapters and batteries from various sources, including the original equipment manufacturer, laptop accessory companies, and the used market.
6. Remove any cards installed in the PC Card slot.
If they're wet, carefully dry them off. If any water has gotten into the narrow slot, dry out the area with a cotton swab, taking care not to leave any threads of cotton in the internal connector.
7. Wipe off any liquid on the display.
Use a clean cloth dampened with water to remove any sticky residue.
8. Remove the hard drive and the CD/DVD drives if you have them installed in plug-in bays.
Dry them off if they're wet. Set them aside.
9. Open the memory module container; remove and dry the memory modules.
Make notes on the placement of the modules. Set them aside.
10. Hand-dry the keyboard surface with a lint-free cloth.
If you spill soda or coffee, consult the instruction manual for your computer and learn how to carefully remove each of the keycaps for the affected area. If the instruction manual includes a picture of the keyboard, make sure that you can see the names of all the keys and their locations; otherwise, make a drawing of the board, paying special attention to the location of some of the specialized keys, including cursor keys, Page Up, Page Down, Scroll Lock, and the like. Or you can use a digital camera to take a picture of the keyboard.
11. Clean the exposed membrane or switch cover and the keys themselves.
Leave the keys to dry before replacing them.
12. Leaving the display open, place the computer on a sturdy surface supported by two books or small boxes.
This setup lets air circulate all around the computer. Leave the computer and all of its separate parts to air dry for at least 24 hours. Don't use a fan or (horrors) a hair dryer to attempt to fast-forward the drying process.
13. Reassemble the pieces that you removed.
Do this step a day or more after doing Step 1 through Step 12, and make sure that everything is dry and that you don't have any dried puddles of sticky acid left anywhere on the machine. Remember to ground yourself before touching any circuitry or modules, and begin the power-up process with the battery first and the AC adapter second.
If in doubt about the safety of any part, you should go ahead and replace it instead of using it. Replacing a battery, an AC adapter, or even a hard disk drive always costs a lot less than replacing a motherboard.